
In this blog, we're focusing on Trigger Conditions and the Compose action – two essential tools for refining your workflows. Learn how Trigger Conditions let you control when flows activate based on specific criteria, and discover the dynamic capabilities of the Compose action, your utility knife for text manipulation and data transformation!
Trigger Conditions
This feature found in the trigger actions Settings allows you to control when a flow is triggered based on specific conditions. This can help prevent unnecessary execution of flows and save processing time. Since every flow run counts against your tenant’s consumption quota, it's important to understand this feature. So, if you're a part of a large organization where a substantial number of users are triggering your flow, or if it’s just a heavily trafficked workflow, this feature plays an integral role in controlling the run consumption and conserving resources.
Every flow requires a trigger in order to execute. One of the most commonly-used triggers is 'When an item is created or modified' for a list, so we'll use this for our example.
Think of the trigger condition as a security guard overseeing your workflow. Picture your SharePoint list item as a person seeking entry, with the security guard checking their credentials. Just as an individual presents their ID and explains their reason for entry, the trigger condition evaluates if the list item meets the specific requirements. For instance, suppose the person's date of birth needs to fall within a specified range to pass through. If the conditions align, they gain access; if not, entry is denied.
A few use cases for trigger conditions when using lists and the 'When an item is created or modified' trigger:
- Multi-step approvals. Approvals that use lists to track approval status, dates, and stages. At each stage, you may want an approval flow to kick off. If you're using the 'When an item is created or modified' without a trigger condition, each of the approval flows you build for each stage may all run concurrently defeating the purpose of the staged approach to the approval.
- Custom notifications. This is useful if you want to send a notification based on a specific field’s value in the list. The out of the box list notification sends an email notification when any field for an item in the list is modified. If we want a more targeted notification, the trigger condition can help us narrow when we want to send one based on the desired list condition.
How to use them
Building expressions play an important role when using Trigger Conditions. I will demonstrate how to build a simple expression that you can test to make sure it passes your condition and then use as the trigger condition. We will use an approval flow as an example. The goal is to only trigger the flow once the manager has approved the item stored in the list, which represents the approval.
First, we are going to use the compose step to just log the value of the Manager Approval field for visibility when the flow runs. Next, we are going to use another compose step to "peek the code", which shows you the code that represents the manager approval value. The 'peek code' setting is in the ellipsis menu at the top right of the action. The last compose step shows a basic expression that checks if the Manager Approval equals Approved.
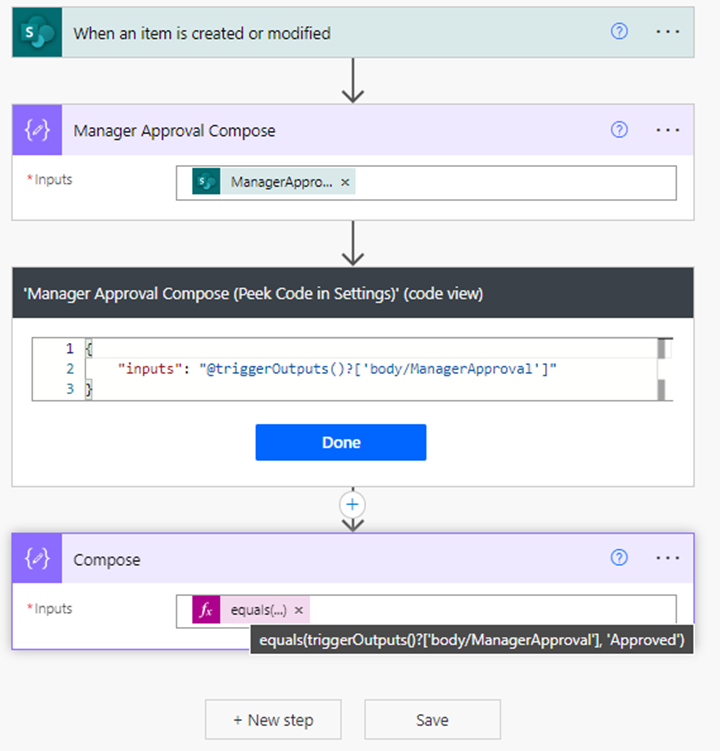
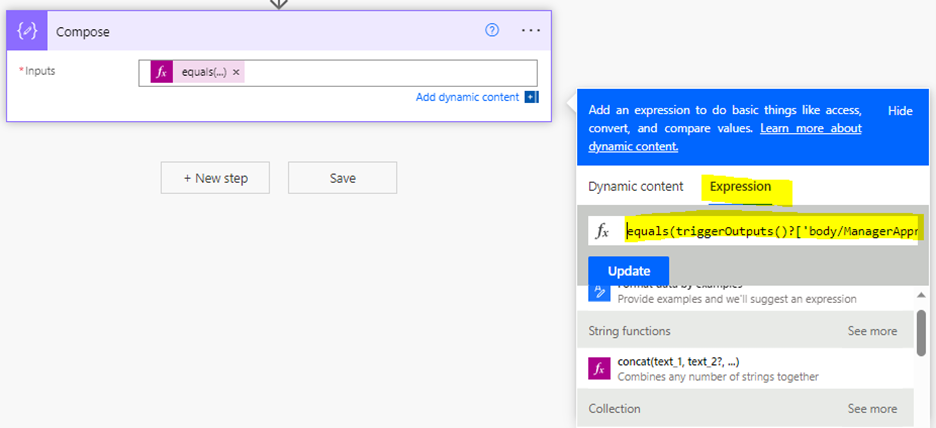
To build this expression in the last compose step, we will click into the *Inputs field, a dynamic content window will pop up, then toggle over to Expression tab. You will build your expression within the fx text input. To check if one value equals another, we use the equals() function. The first parameter for the equals function is where you will put the Manager Approval value as shown in the peeked code, and the second parameter will be what you want it to equal - in this case we want it to match the value of 'Approved'.
Full expression: equals(triggerOutputs()?['body/ManagerApproval'], 'Approved')
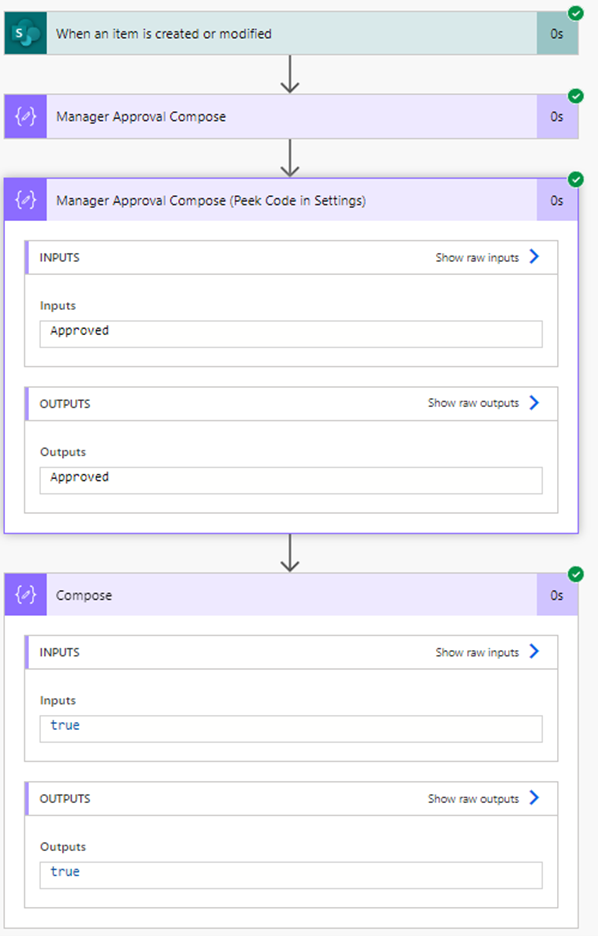
Now, to trigger the flow, we will create an item in the approval list and put Approved in the Manager Approval (single line of text) field. When you check the flow run, it will show you the value of 'Approved' in the first/second compose steps, and the third compose step will show 'true', as the expression we built evaluates to true.
Finally, we will use the expression we built as the trigger condition expression. You will copy the expression from the third compose step and paste it into the trigger condition setting for the trigger (When an item is created or modified), with the additional of an "@" symbol before the expression.
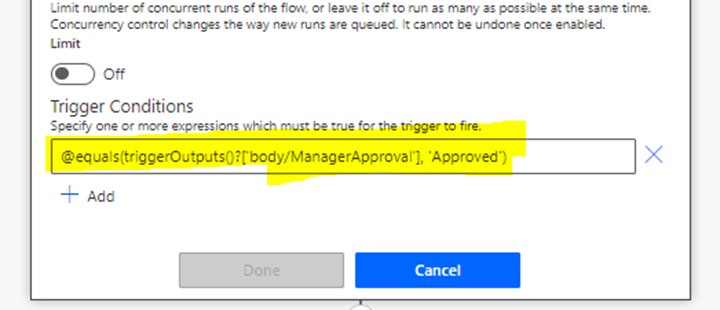
Now, you can test this trigger condition by changing the Manager Approval field value to anything other than Approved and it will not allow the flow to kick off. And then conversely change it back to Approved and it will now allow the flow to execute. We can verify this in the run history of the workflow menu. Well done! Now onto a more detailed look at the Compose action!
Compose Action: Your workflow utility knife
As described in the previous section, we demonstrated how to use the Compose step as a versatile tool to log dynamic content values as well as the ability to build expressions. In this section, we'll dive a bit deeper into its capabilities and demonstrate some more use cases. You can think of this tool as a digital workbench where you craft, shape and refine your data to meet your specific needs. You can merge text, numbers, perform calculations and construct intricate expressions. Beyond the data manipulation, it serves as a virtual storage area within your flow.
Some use cases include:
- Formatting multi-line text before sending it as the body of an email.
- Perform data extraction from complex objects (e.g. response objects from HTTP requests).
- Perform mathematical operations (e.g. calculate tax amounts/total costs for incoming invoices).
- Simply storing a temporary variable to use later in the flow.
How to use them
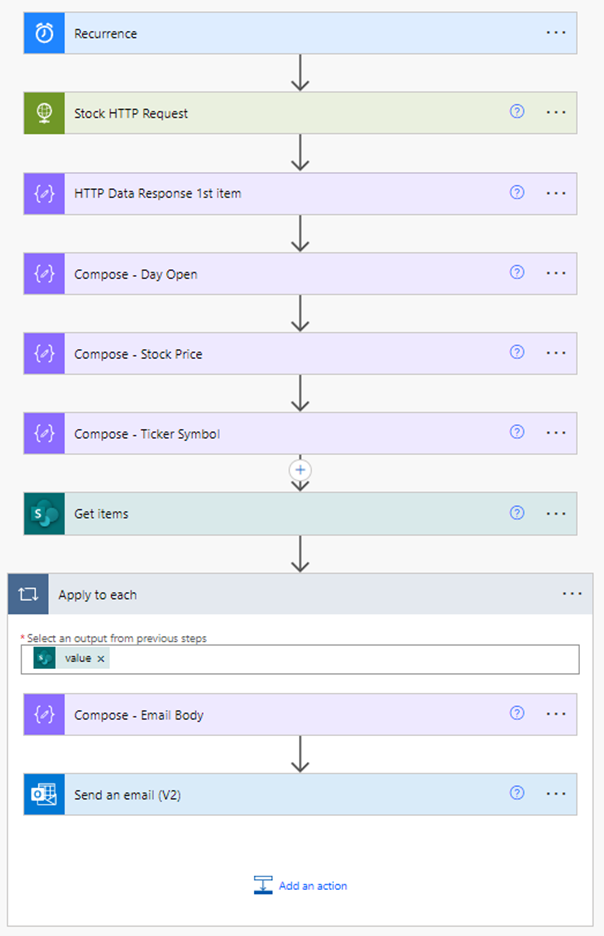
In the following section, I will showcase multiple ways that you can use the Compose step within one flow. The flow will run on a Scheduled basis (once daily at 10am), it will first pull Microsoft stock data from an API via the HTTP action and extract different pieces of data into separate Compose steps. Then, it will get all the items from a SharePoint list that stores the sender, recipients, and other data that will be sent along in an email along with the stock data. We will use the Compose steps for data extraction from the API response as well as formatting multi-line text for the email being sent out to each recipient. We will also use it to log some dynamic content to view along the way!
This screenshot shows the entire flow's structure, step by step.
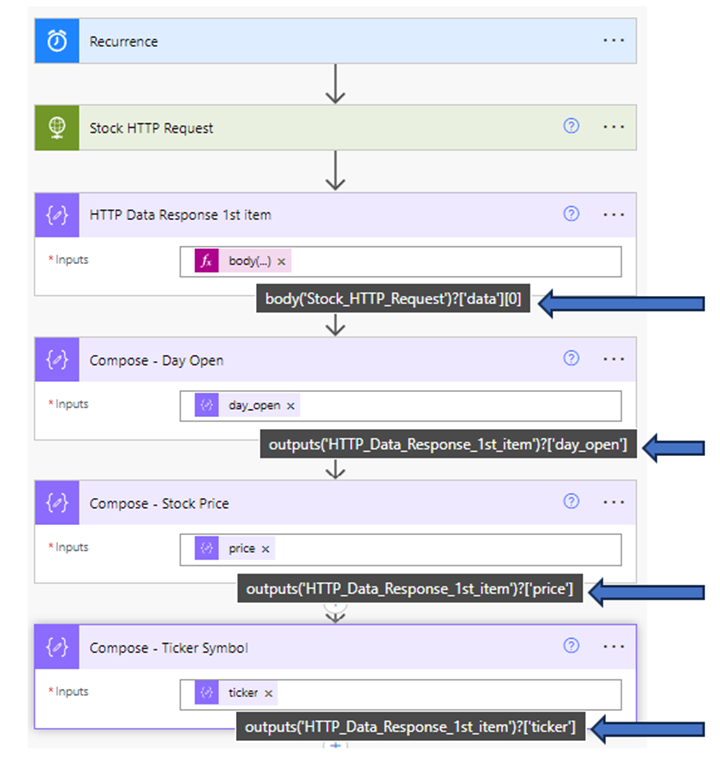
The 'Stock HTTP Request' action returns a complex object from the API as seen below. And we use the Compose steps to extract each data point that we'll use further down in the flow to send in the email body.
{
"meta": {
"requested": 1,
"returned": 1
},
"data": [
{
"ticker": "MSFT",
"name": "Microsoft Corporation",
"currency": "USD",
"price": 316.51,
"day_open": 314.51,
}
]
}
In the screenshot below, the blue arrows show each of the expressions that were built to extract each piece of data from the API response. The first compose step pulls the 1st object from the API responses "data" array. The following compose steps drill down into the object to extract the "day_open", "price" and the "ticker".
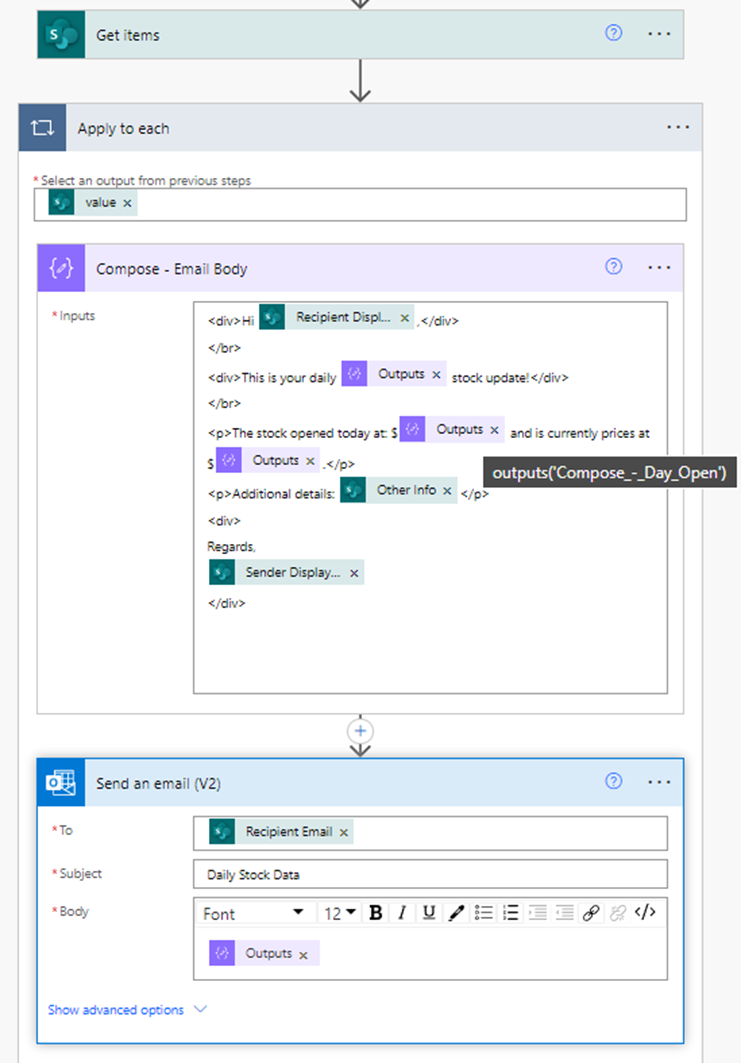
Once we store all the stock data into temporary compose variables, we move on to get all the items from the list that we're storing recipient/sender info, and additional information. In the last Compose step, we're building the html body for the email. It includes dynamic content from the 'Get Items' action as well as the stored variables from the previous Compose steps.
And there you have it!
In this exploration of Power Automates capabilities, we've honed in on Trigger Conditions and the Compose action. By mastering Trigger Conditions, you've acquired the skill to wield a precision instrument, deciding when flows come to life based on specific conditions. Equally instrumental, the Compose action serves as your dynamic utility knife, manipulating data with finesse and constructing tailored outputs. As you journey forward, Trigger Conditions and the Compose action can guide you toward smarter automation. With these insights, you're equipped to elevate your automation prowess!